Medium Post | July 1st, 2021 | 5 min read
Documents have been ubiquitous ever since humans first developed the written script. Magazines, agreements, historical archives, pamphlets at the local store, tax forms, property deeds, college application forms and so on. Processing these documents has been a rather manual task thus far, with automation only beginning to take over in the last few decades. This automation journey has largely been impeded by a crucial pitfall- Computers can’t understand layouts as intuitively as humans.
With the advent of modern Computer Vision all this changed. We now have models that can accurately locate, represent and understand components of a document’s layout. But these models are rather abstract to the average automation enthusiast, usually requiring comprehensive knowledge in Python to even contemplate an attempt at understanding the documentation let alone use it in a project.

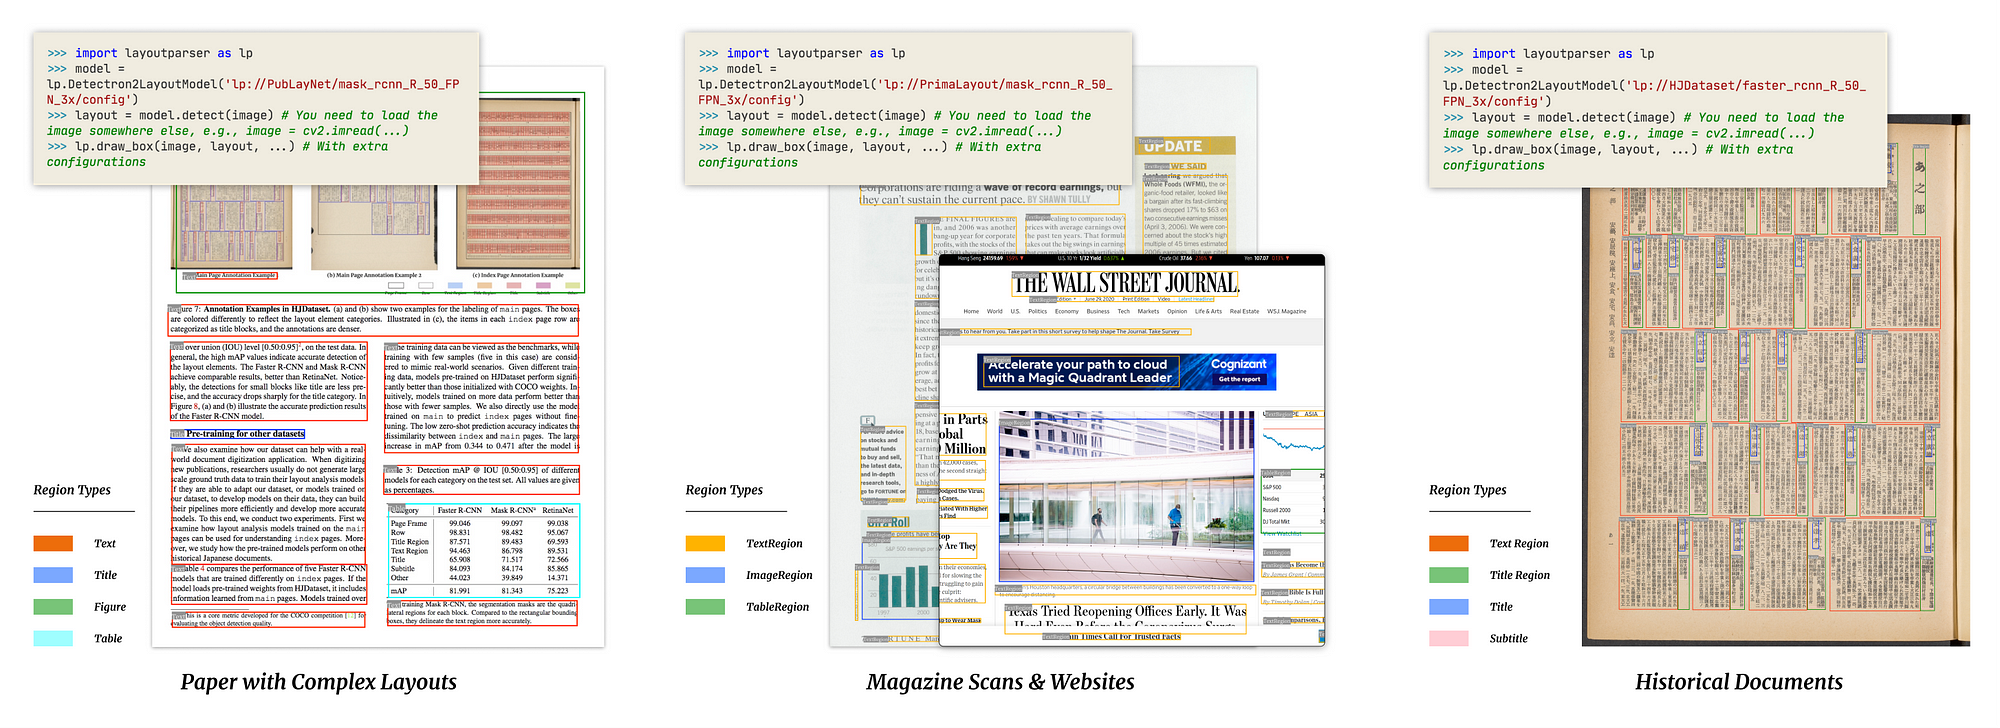
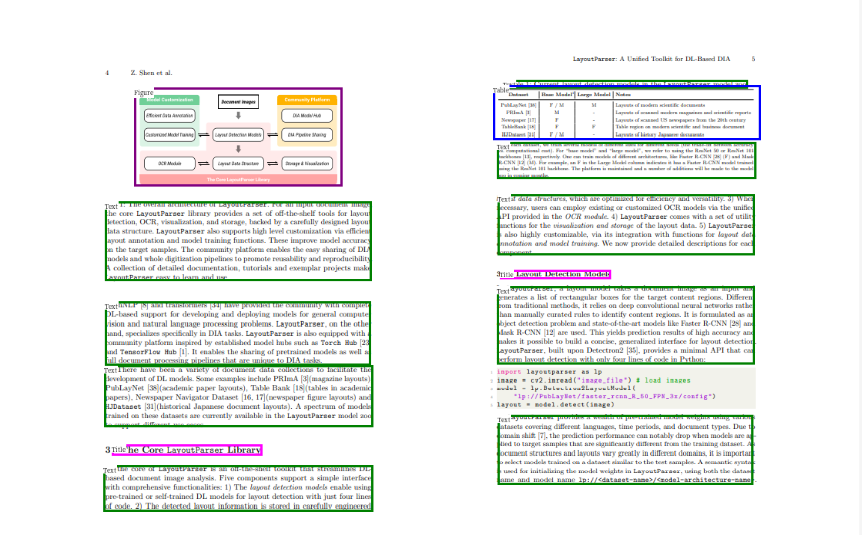
To that extent, Layout Parser, as explained in their really cool paper, alleviates this complexity with a clean API that allows and enables complete end to end layout detection, parsing and understanding in just a few (and I mean really few, like 5) lines of code. They have a bunch of models that can be used straight out of the box. All in all a super cool tool.
Now, how can one use this tool to understand and work on custom layouts beyond the capabilities of the pre-trained models?
And you are right, it is the best way to go, especially given that not all of us have access to the hardware firepower required to train such models from scratch.
While the finetuning process is a tad more technically involved than just using a pre-trained model, a handy repository created by the authors of Layout Parser, helps alleviate some of these issues by largely handling the untenable bits of the training/ finetuning activity.

In the following sections we go through a comprehensive tutorial on using this repository to train your own custom models.
- Python ≥ 3.6
- Detectron2 forked or cloned from the master branch.*
- Latest version of Layout Parser and it’s dependencies.
- Pytorch (Linux: 1.6+ or Windows: 1.6)**
- CUDA toolkit: 10+ (As compatible with Pytorch)***
- Dataset: Annotated in COCO format.
*Detectron2 is not easily installed on Windows systems, please refer to this fantastic post by ivanapp for guidance on the Windows based installation process.
**Though 1.8 is recommended in the official docs, Windows users should stick to 1.6.
***CUDA is not mandatory and one could theoretically train on CPU as well. Although, such a training attempt would be painfully slow.
- Clone or fork the layout-model-training repository to your system.
- Open up a command/anaconda prompt and activate the environment, where Layout Parser and Detectron2 is installed.
- Change the working directory to the location where the layout-model-training repo was saved.
- Packaged in the layout-model-training repo is an inbuilt script (
utils\cocosplit.py) to perform dataset splitting into test and train subsets. - The script ensures that in the event of images without tagged regions being present in the dataset, the ratio of tagged to untagged images in the train and test subsets will be equal.
- Use the below command to split your dataset (Assuming the working directory is as instructed in the previous step).
Note that the above command is on a Windows 10 based system, alter the path separators according to the Operating System.
- annotation_path: The path to where the consolidated dataset lies.
- train and test: The path to where the train/ test dataset should be saved.
- split-ratio: The fraction of the consolidated dataset to be allocated for training.
- Download a pre-trained model and its related config file from Layout Parser’s model zoo.
- The download consists of two files:
- model_final.pth: This is the pre-trained model’s weights.
- config.yaml: This is the pre-trained model’s configuration. For information about the configuration file, refer the Detectron2 Docs.
Now that the dataset is split and the pretrained model weights are downloaded, let’s get to the juicy part: model training (or rather finetuning).
- The training is done using the training script at
tools\train_net.py - Use the command below to train the model.
Note that the above command is on a Windows 10 based system, alter the path separators according to the Operating System.
- dataset_name: The name of the custom dataset (One can name it as one pleases).
- json_annotation_train: The path to the training annotations.
- json_annotation_val: The path to the testing annotations.
- image_path_train: The path to the training images.
- image_path_val: The path to the testing images.
- config-file: The path to the model configuration file downloaded in Step 3.
Note that the rest of the argument-value pairs are actually config modifications and are specific to the use case (sometimes). For clarity on how to use and set them, refer the Detectron2 Docs.
- The finetuned model along with its config file, training metrics and logs will be saved in the output path as indicated by the
OUTPUT_DIRin the command above.
With the finetuned model, it is a straightforward task to use it to parse documents.
- Replace the model initialization with the below code in Layout Parser’s demo.
Note that the above paths are based on a Windows 10 based system, alter the path separators according to the Operating System.
custom_label_mapis theint_label -> text_labelmapping. This mapping is made in accordance to the'categories'field present in the training data’s COCO Json in the following way:{'id': 'name'}for eachcategory. For instance:
custom_label_map = {0: "layout_class_1", 1: "layout_class_2"}
All in all, custom models on any dataset can easily be trained using the layout-model-training repo. Such models can be used to parse and understand a wide variety of documents with relative ease post training.
[1] Y. Wu, A. Kirillov, F. Massa, W. Y. Lo and R. Girshick, Detectron2: Facebook AI Research’s next generation library that provides state-of-the-art detection and segmentation algorithms (2019), GitHub Repo
[2] Z. Shen, R. Zhang, M. Dell, B. C. G. Lee, J. Carlson and W. Li, LayoutParser: A Unified Toolkit for Deep Learning Based Document Image Analysis (2021), arXiv preprint arXiv:2103.15348
[3] T. S. Lin, M. Maire, S. Belongie, L. Bourdev, R. Girshick, J. Hays, P. Perona, D. Ramanan, C. L. Zitnick and P. Dollár, Microsoft COCO: Common Objects in Context (2015), arXiv preprint arXiv:1405.0312v3