A self-hosted AWS multi-account access portal that runs on Cloudflare Workers. Give your team a single place to sign into any AWS account, see which roles they can assume, track cloud spend, and manage access — all gated behind your existing Cloudflare Zero Trust identity provider.
Managing IAM access across many AWS accounts is painful:
- You want engineers to sign in with one identity (Google, Okta, GitHub, etc.) instead of juggling IAM users per account.
- You don't want to pay for or operate AWS IAM Identity Center.
- You want fine-grained control over which person can see which role in which account.
- You want visibility into cost, resources, and who-did-what — without wiring up five different AWS services.
AWS AccessBridge is a single Cloudflare Worker that gives your team a web UI for exactly that. It uses your Cloudflare Zero Trust login, stores AWS credentials encrypted in Cloudflare D1, and hands out short-lived session credentials on demand.
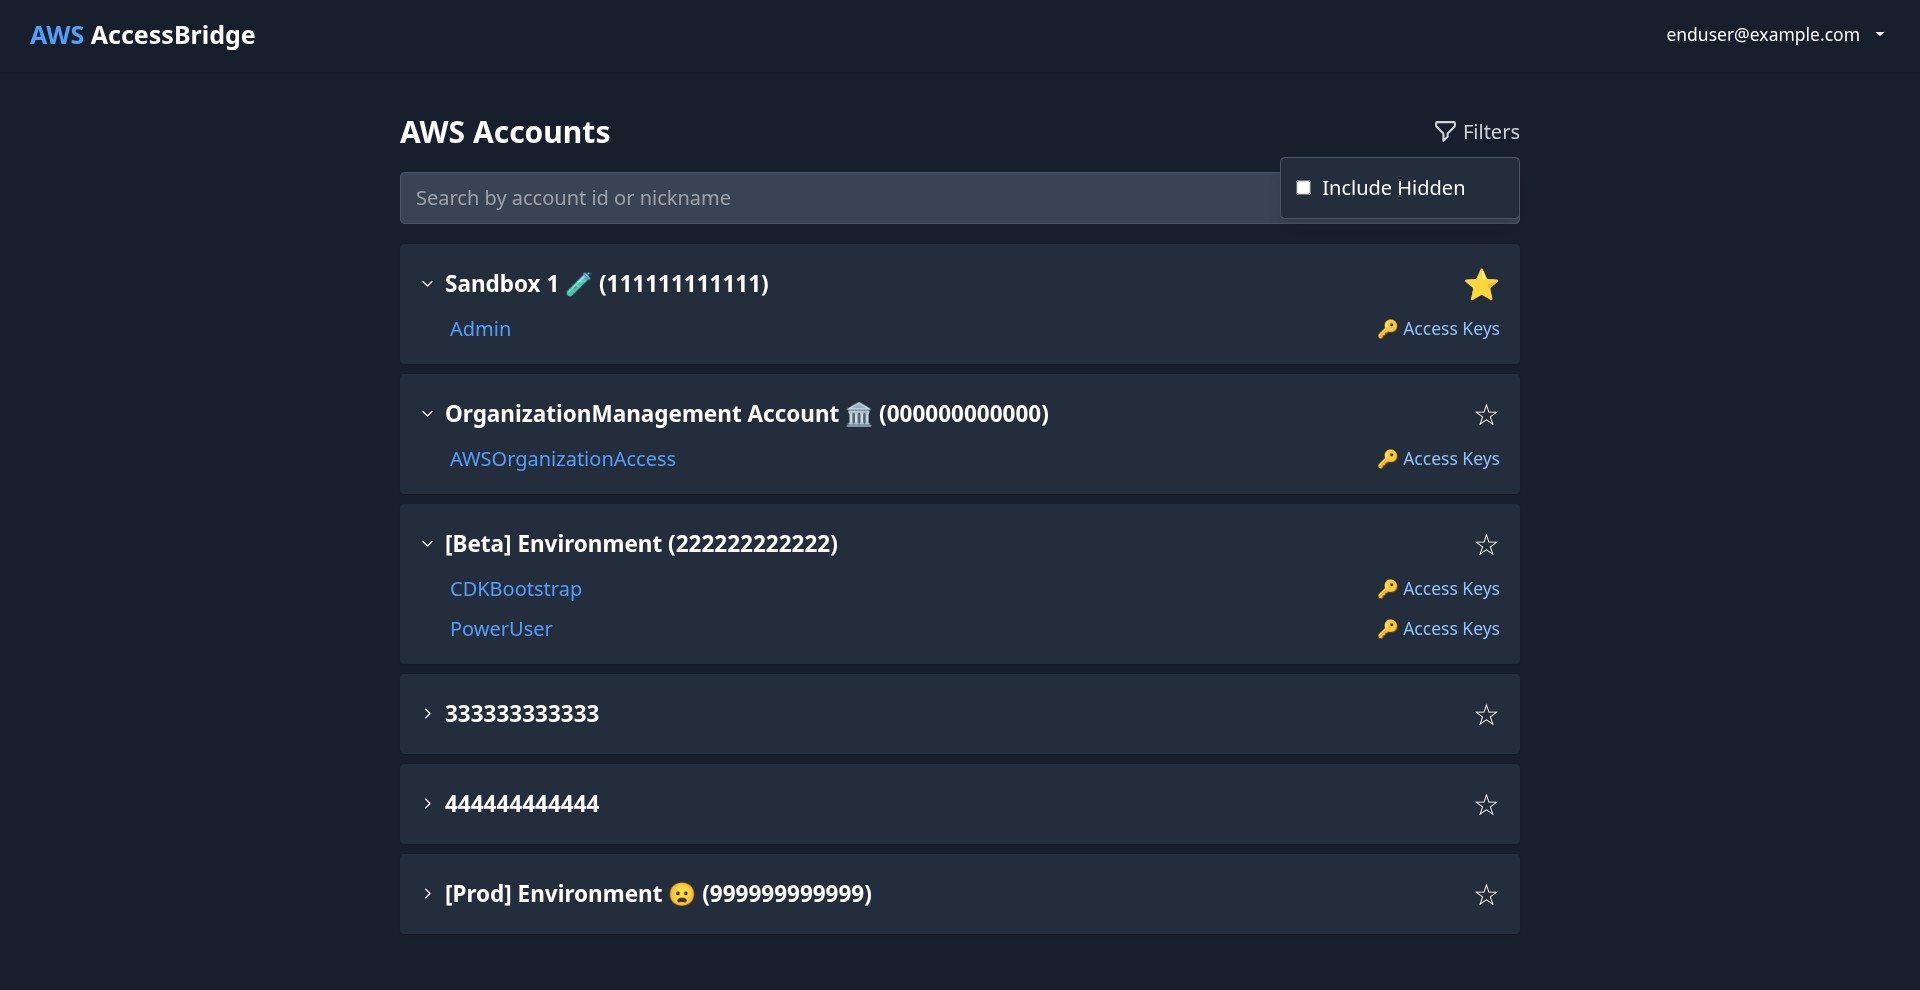
- One-click AWS Console sign-in — pick an account, pick a role, land in the Console with temporary credentials.
- Programmatic credentials — get short-lived
access_key_id/secret_access_key/session_tokenfor the CLI or SDKs. - Multi-hop role chains — chain credentials across accounts (base IAM user → intermediate role → target role) up to your configured chain depth.
- Per-user role visibility — control exactly which roles each user can see and assume, and let users hide roles they don't want cluttering their view.
- Favorites — users can pin their most-used accounts to the top.
- Personal access tokens — users can mint scoped PATs for use in scripts and CI.
- Multi-tenant teams with admin/member roles.
- Scope AWS accounts to specific teams so only team members see them.
- Per-team admin controls for member and account membership.
- Cost dashboard — daily/weekly/monthly spend by account, trend charts, and total-spend cards powered by AWS Cost Explorer.
- Spend alerts — configurable thresholds that notify when an account crosses a dollar limit.
- Resource inventory — paginated, filterable view of EC2 instances, S3 buckets, Lambda functions, and RDS databases across every connected account, refreshed in the background.
- Guided onboarding wizard — a 6-step in-app flow (Account → Credentials → Chain → Roles → Users → Summary) that walks a new admin through their first account and first user grant.
- Credential validation & chain testing — verify credentials and simulate a full assumption chain before you grant access.
- IAM role discovery — list all IAM roles in a connected account so you can pick assumable ones from a dropdown instead of typing ARNs.
- Account nicknames — give AWS account IDs human-friendly names.
- Role configs — per-role default Console deep-link path and region.
- Audit log viewer — filterable, paginated view of every API action taken through AccessBridge, with configurable retention.
- Maintenance — one-click purge of orphaned rows in satellite tables (cost data, spend alerts, resource inventory, role configs, team memberships) left behind when an account or credential is removed.
- Cloudflare Zero Trust enforces identity at the edge — AccessBridge never handles passwords or OIDC directly.
- AES-GCM encryption for all stored AWS credentials, with the key held in Cloudflare Secrets Store.
- HMAC-signed internal requests between worker components, with a 1-second timestamp window to block replay.
- Every API call is audit-logged automatically and retained for the period you configure.
- Demo mode flag disables all admin write operations — safe for public demo deployments.
Deployment has two halves: standing up the Cloudflare side (where the app lives), and configuring the AWS side (where the roles live). The in-app onboarding wizard handles most of the AWS-side work after the first deploy.
- Cloudflare account with Workers, D1, KV, Secrets Store, and Zero Trust enabled
- Node.js 18+ (CI uses Node 24)
- AWS account(s) where you want to grant access
- Your own domain on Cloudflare (recommended, for Zero Trust-protected routes)
Use this path the first time you deploy, or if you don't want to use GitHub Actions. All commands are run from the project root.
git clone https://github.com/<your-username>/AWS-AccessBridge.git
cd AWS-AccessBridge
npm install
npx wrangler login
Verify you're authenticated with the right account:
npx wrangler whoamiAccessBridge needs one D1 database, one KV namespace, and one Secrets Store with two secrets inside it. Create them in any order.
D1 database:
npx wrangler d1 create aws-access-bridge-dbCopy the database_id from the output.
KV namespace (for credential cache):
npx wrangler kv namespace create AccessBridgeKVCopy the id from the output.
Secrets Store + two secrets:
npx wrangler secrets-store store create aws-access-bridge-secretsCopy the store ID. You can generate the two secret values automatically by running the project's setup script (recommended) — see Step 3.
Copy the template and fill in the IDs from Step 2:
cp wrangler.jsonc.template wrangler.jsoncOpen wrangler.jsonc and replace every placeholder (the 0000… strings) with the real IDs:
d1_databases[0].database_id→ your D1 IDkv_namespaces[0].id→ your KV ID- Both
secrets_store_secrets[*].store_id→ your Secrets Store ID
Then generate and upload the two secrets in one go:
npx tsx scripts/init-secrets.tsThis script reads wrangler.jsonc, detects the two expected secrets (aws-access-bridge-aes-encryption-key, aws-access-bridge-internal-hmac-secret), generates cryptographically strong values for each, and uploads them to the store. Re-running it is a no-op — it skips any secret that already exists.
If you'd rather generate the secrets yourself:
# AES-GCM 256-bit key (base64)
openssl rand -base64 32 | npx wrangler secrets-store secret create <STORE_ID> \
  --name aws-access-bridge-aes-encryption-key --scopes workers --remote

# HMAC secret (base64)
openssl rand -base64 32 | npx wrangler secrets-store secret create <STORE_ID> \
--name aws-access-bridge-internal-hmac-secret --scopes workers --remote- Open the Zero Trust dashboard → Access → Applications → Add an application → Self-hosted.
- Fill in:
- Application name: AWS AccessBridge
- Subdomain + domain: whatever URL your worker will live at
- Session duration: 8 hours is a good default
- On the next screen, create at least one Access policy:
- Action: Allow
- Include: the emails, email domains, or IdP groups that should be allowed in.
- Save the application.
If your worker and your domain live in the same Cloudflare account (the common case), you're done — AccessBridge infers the Zero Trust team and application audience automatically at runtime. You do not need to set POLICY_AUD or TEAM_DOMAIN.
If your worker lives in a different Cloudflare account from the domain owner (e.g. you're serving a customer's domain via Cloudflare for SaaS), the worker can't infer the owning account's Zero Trust config, so you must set both explicitly:
-
On the Zero Trust application overview, copy the Application Audience (AUD) tag.
-
Note the owning account's team domain (e.g.
https://acme.cloudflareaccess.com). -
Add both to
wrangler.jsonc:
npx wrangler d1 migrations apply --remote aws-access-bridge-dbYou should see the 26 migration files apply cleanly. Re-running is safe.
npm run deploynpm run deploy chains: prettier → lint → vite build → wrangler deploy --dry-run → wrangler deploy. If anything fails, nothing is deployed.
When it succeeds, wrangler prints the deployed URL (either *.workers.dev or your custom route). Visit it — you should hit Cloudflare Zero Trust first, then land in AccessBridge.
The first user to sign in is just a normal user — you need to promote yourself once:
npx wrangler d1 execute aws-access-bridge-db --remote --command \
  "INSERT INTO user_metadata (user_email, is_superadmin) VALUES ('you@example.com', 1) \
   ON CONFLICT(user_email) DO UPDATE SET is_superadmin = 1;"
Refresh the app and you'll see the Admin tab appear. From there, open Setup Wizard for the guided onboarding of your first AWS account.
The repo ships with a deploy workflow at .github/workflows/deploy-cloudflare-worker.yml that runs on every push to main. This is the recommended path for forks — push to your fork's main and your worker redeploys automatically.
-
Fork the repository on GitHub.
-
Run Steps 1–5 of the manual guide once locally (clone, install, create Cloudflare resources, set up Zero Trust, apply migrations). You need a working
wrangler.jsoncto continue. -
Create a Cloudflare API token with these permissions:
- Account → Workers Scripts: Edit
- Account → Workers KV Storage: Edit
- Account → D1: Edit
- Account → Cloudflare Secrets Store: Edit
- Zone → Workers Routes: Edit (only if using custom routes)
-
Add GitHub Secrets to your fork (
Settings → Secrets and variables → Actions → Secrets):CLOUDFLARE_API_TOKEN— the token from step 3CLOUDFLARE_ACCOUNT_ID— your Cloudflare account ID
-
Add a GitHub Variable (not a secret —
Settings → Secrets and variables → Actions → Variables):WRANGLER_JSONC— paste the entire contents of your localwrangler.jsonchere.
The workflow writes this out to
wrangler.jsoncat the start of each run (sincewrangler.jsoncitself is gitignored). -
Push to
main. TheDeploy Cloudflare Workerworkflow kicks off automatically and will:- Validate that
WRANGLER_JSONC's$versionis at least the template's$minimumVersion - Initialize any missing secrets via
scripts/init-secrets.ts - Apply pending D1 migrations to your remote database
- Build the Vite SPA
- Hide the OpenNext config files (so wrangler doesn't OOM trying to build the Next.js path on the CI runner)
- Run
wrangler deploy
- Validate that
You can also trigger the workflow manually via Actions → Deploy Cloudflare Worker → Run workflow.
The template evolves (new bindings, new vars). If CI fails with a "version below minimum" error, update the $version and any new fields in your WRANGLER_JSONC GitHub variable to match the latest wrangler.jsonc.template.
For the best security posture, have AccessBridge assume an intermediate role instead of giving its base IAM user broad permissions. The onboarding wizard nudges you toward this pattern, but here's the full picture.
Create an IAM user with permission to assume only the intermediate role:
Name: DO-NOT-DELETE-Federated-SSO-AccessBridge
Permissions (inline policy):
  sts:AssumeRole → arn:aws:iam::<account>:role/DO-NOT-DELETE-AccessBridge-Intermediate
Generate an access key pair for this user and paste it into AccessBridge (Admin → Credentials, or via the Setup Wizard).
Create a role trusted by the user above, with permission to assume target roles:
Name: DO-NOT-DELETE-AccessBridge-Intermediate
Trust policy: allow the base IAM user to AssumeRole
Permission policy:
  sts:AssumeRole → arn:aws:iam::<account>:role/*
For every role your team actually uses, update the trust policy to allow the intermediate role:
{
  "Effect": "Allow",
  "Principal": { "AWS": "arn:aws:iam::<account>:role/DO-NOT-DELETE-AccessBridge-Intermediate" },
  "Action": "sts:AssumeRole"
}- Small blast radius — the long-lived IAM user can only do one thing: call
AssumeRoleon the intermediate. - Clean audit trail — every access shows up in CloudTrail as intermediate → target.
- One principal to trust — existing target roles only need to trust the intermediate role, not a user or an external SSO principal.
Open the app → Admin → Setup Wizard. The 6 steps are:
| Step | What you do |
|---|---|
| 1. Account | Enter an AWS account ID and a friendly nickname. |
| 2. Credentials | Paste the base IAM user access key + secret. |
| 3. Chain | Optionally add the intermediate role ARN. Test the full chain before saving. |
| 4. Roles | The app lists IAM roles in the account — pick which ones should be assumable. |
| 5. Users | Grant specific users access to specific roles. |
| 6. Summary | Review everything and commit. |
After the first account, you can repeat for additional accounts from the same Admin panel, or use the rest of the admin tabs directly without the wizard.
All of these live in wrangler.jsonc under vars.
| Variable | Purpose | Default |
|---|---|---|
POLICY_AUD |
Zero Trust Application Audience tag. Optional — only required when the worker and domain are in different Cloudflare accounts (Cloudflare for SaaS). Auto-inferred otherwise. | — |
TEAM_DOMAIN |
Zero Trust team domain (e.g. https://acme.cloudflareaccess.com). Optional — same conditions as POLICY_AUD. |
— |
MAX_TOKENS_PER_USER |
How many active Personal Access Tokens a user can hold. | 5 |
MAX_TOKEN_EXPIRY_DAYS |
Max expiry a user can set on a PAT. | 90 |
PRINCIPAL_TRUST_CHAIN_LIMIT |
Max depth of role assumption chain. | 3 |
AUDIT_LOG_RETENTION_DAYS |
How long to keep audit log entries. | 90 |
DEMO_MODE |
When "true", all admin write operations are blocked. Safe for public demos. |
"false" |
After the first deploy, a few quick health checks:
# Does the worker respond? (You'll hit Zero Trust unless you're signed in.)
curl -I https://<your-worker-url>/

# Are there any errors in the worker log tail?
npx wrangler tail

# Is the scheduled handler working?
curl "https://<your-worker-url>/__scheduled?cron=*/10+*+*+*+*"

# Is the OpenAPI doc rendering?
open https://<your-worker-url>/docs- "Unauthorized" on every request — if your worker and domain are in different Cloudflare accounts (Cloudflare for SaaS), make sure
POLICY_AUDandTEAM_DOMAINare set and match the owning account's Zero Trust application. If they're in the same account, these vars should be unset so auto-inference kicks in. - Admin tab is missing — you haven't been promoted to superadmin yet. See Step 7 of the manual guide.
- CI fails with "version below minimum" — your
WRANGLER_JSONCGitHub variable is stale. Diff it againstwrangler.jsonc.templateand bump the$versionfield. wrangler deployOOMs in CI — make sure the workflow's "Prepare for Deploy" step is hidingopen-next.config.tsandnext.config.ts. Without that, wrangler delegates to the OpenNext Next.js build which needs 2GB+ RAM.- Credentials cached forever after rotating an IAM key — the credential cache refresh task runs every 10 minutes. You can force it via
GET /__scheduled?cron=*/10+*+*+*+*.
(More screenshots in the assets repo.)
npm run dev          # Vite dev server for the frontend
npx wrangler dev     # Local Cloudflare Workers runtime for the backend
Useful scripts:
| Command | What it does |
|---|---|
npm run build |
Format, lint, and build the SPA with Vite |
npm run deploy |
Build + wrangler deploy --dry-run + wrangler deploy |
npm run test |
Run the vitest test suite |
npm run tsc |
Type-check frontend and backend tsconfigs |
npm run lint |
ESLint autofix |
npm run prettier |
Prettier format |
AGENTS.md— architecture, endpoint inventory, database layout, scheduled tasks, and everything else an LLM agent or new contributor needs to navigate the codebase.- OpenAPI docs — the running worker serves interactive API docs at
/docs.
- Fork the repository and create a feature branch.
- Make changes, add tests, and run
npm run build(runs prettier + lint + Vite build). Usenpm run deployto also dry-run wrangler before shipping. - Open a pull request.
For issues, questions, or contributions, please visit the GitHub repository.