An embedded sim racing dash with a real instrument-cluster layout. Built for readability and reliability while racing. Runs on Raspberry Pi with 7" displays and supports Gran Turismo 7 telemetry.
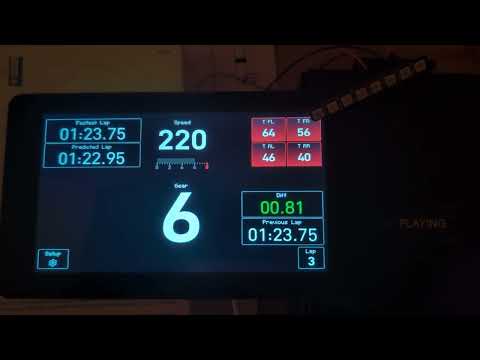

- Tire temperatures
- Vehicle speed
- Gear indicator
- Graphical RPM
- Shift lights (torque-based optimal shift point)
- Best lap time
- Previous lap time
- Predicted lap time
- Live delta (in real-time)
The delta time widget shows the time difference between the current lap and the reference lap in real-time. The implementation follows professional motorsport dashboard patterns (similar to MoTEC, AiM) to ensure the display is informative without being distracting.
┌─────────────────┐      ┌─────────────┐      ┌──────────────────┐
│  DeltaSignal    │─────▶│ VehicleBus  │─────▶│ DeltaTimeWidget  │
│  (calculator)   │      │  (signals)  │      │   (display)      │
└─────────────────┘      └─────────────┘      └──────────────────┘
     60 Hz                  raw delta           200ms refresh
   continuous              passthrough          + hysteresis
- DeltaSignal (
delta_signal.py): Calculates the delta time continuously at full telemetry rate (~60 Hz) and publishesdelta_diffto the vehicle bus - DeltaTimeWidget (
delta_time_widget.py): Readsdelta_difffrom the bus and applies display filtering before rendering
Raw delta values update at ~60 Hz, but displaying every update would cause distracting digit flicker. The widget uses sample-and-hold to limit visual updates:
| Parameter | Value | Purpose |
|---|---|---|
_refresh_period |
0.2s | Display updates at most 5× per second |
_force_refresh |
flag | Bypasses rate limiting on lap changes |
This ensures the driver can glance at the display and read a stable value without the digits constantly changing.
Even with rate limiting, the display can flicker when the delta value oscillates near a digit boundary (e.g., +0.99 ↔ +1.00). Hysteresis (dead-band filtering) solves this:
| Parameter | Value | Purpose |
|---|---|---|
_hysteresis |
0.02s | Minimum change required to trigger a display update |
The display only updates when:
|new_delta - displayed_delta| ≥ 0.02 seconds (20ms)
This eliminates "digit hunting" where small oscillations cause the least-significant digit to flip back and forth rapidly.
- Color coding: Green (ahead of reference), Red (behind reference)
- Trend dashes: 1–5 dashes indicating magnitude (0.1s per dash), positioned left (ahead) or right (behind) of the value
-
Single-board computers
- Raspberry Pi 4 Model B (1GB RAM, built-in Wi-Fi)
-
Displays
- Raspberry Pi Touch Display 2, 24-bit RGB, 720×1280, five-finger touch
-
Peripherals
- Pimoroni Blinkt! 8-LED bar
-
Input
- Touch control (UI buttons)
- On-screen soft keys for display brightness (+ / −)
If you prefer the turnkey experience of a standalone system (fast boot straight into the dash), download the prebuilt Raspberry Pi image and follow the installation instructions in the Wiki.
The codebase uses uv for managing the dependencies and the virtual environment. Follow the installation guide for uv.
After installing uv on your system switch to the repo root and execute
uv venv
source .venv/bin/activate # Windows: .venv\Scripts\activate
uv sync

python -m instrument_clusterSpecify the debugger configuration by creating a launch.json file in the "Run and Debug" view. Then paste the following and save.
{
    "version": "0.2.0",
    "configurations": [{
        "name": "Python Debugger: Current File",
        "type": "debugpy",
        "request": "launch",
        "module": "instrument_cluster.main",
        "cwd": "${workspaceFolder}",
        "env": {
            "PYTHONPATH": "${workspaceFolder}/src"
        },
        "console": "integratedTerminal"
    }]
}
Now you are ready to start debugging by hitting F5 or by pressing the green arrow.
This project is created for educational and personal use and provided without warranty of any kind, express or implied. Use at your own risk.
All trademarks, logos, and brand names are the property of their respective owners.
Gran Turismo, Gran Turismo 7, GT7 and PlayStation are trademarks or registered trademarks of Sony Interactive Entertainment Inc. and Polyphony Digital Inc.
All of my code is MIT licensed. Libraries follow their respective licenses.