Presentation: {Robotics Mini Course in Micropython @ Monumental}
In this hands-on session, you’ll learn the fundamentals of robotics using MicroPython and an ESP32 microcontroller. We’ll guide you through building a simple robot that can light up LEDs and move a handmade part. The workshop covers wiring, coding, and basic motion control principles, which you can later expand to include sensors or APIs. After this tutorial you'll know how to actuate a motor and read sensor data with MicroPython. Everything you'll need to build your own robot!
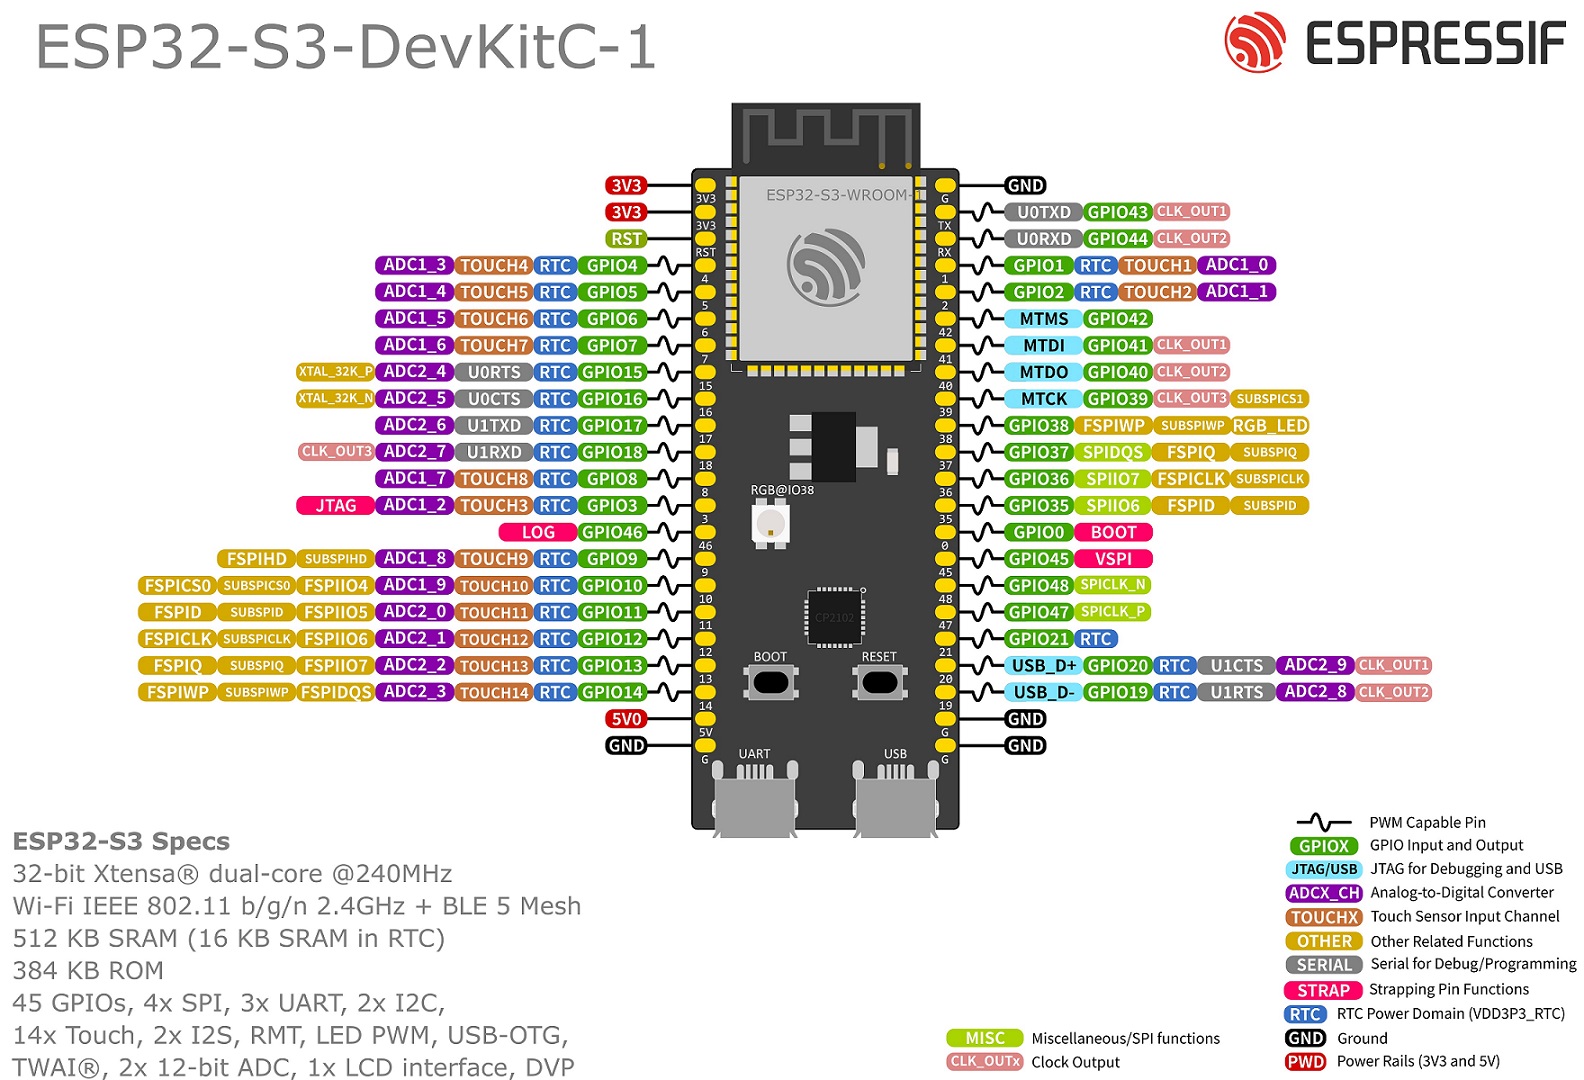
- ESP32-S3-DevKit development board
- Micro 180° servo motor (SG90 or similar)
- Jumpers to connect the motor
- USB data cable for programming
- PyLadies Amsterdam uses uv for dependency management
- Python 3.10+
- On Windows: USB access must be enabled, some enterprise-managed devices may have restrictions
- Only remote participants:
Flash MicroPython to your ESP32 dev board:
- Follow the steps here Make sure to use the .bin firmware file
- Clone repository and install dependencies Run the following code:
  git clone git@github.com:pyladiesams/robotics-with-micropython-jan2026.git
  cd robotics-with-micropython-jan2026

  # create and activate venv, install dependencies
  uv sync
source .venv/bin/activate- Connect the ESP to your laptop and find out at which serial port it is connected:
  # macOS
  ls /dev/cu.* | grep usb

  # Linux
  ls /dev/tty*
  # If many devices show up, run the command twice
  # once with the ESP connected and once without
  # afterwards you might need to set additional permissions to upload

  # Windows
  # Check "Device Manager" for COM ports
  # the port you are
LED Blink is the "Hello World" of hardware development.
The ESP32 devboard already has an onboard LED we can use. On the devboard it is connected to the ESP32. In order to program it we need to figure out to which PIN of the ESP the LED is connected.
Update the code with the right pin.
step1_led_blink/main.py
After uploading press the reset button on the devboard.
If everything is correct you should now see the LED blinking.
python utils/upload.py <PORT> step1_led_blink/main.pyFeel free to change the blinking behaviour, eg make a nice rainbow pattern or a continuous color change.
We control a servo motor using PWM signals. PWM (Pulse Width Modulation) sends a repeating signal at a fixed frequency. Each cycle consists of a HIGH pulse followed by a LOW period. The duty cycle is the percentage of time the signal is HIGH during each cycle. For servos, the pulse width (duration of the HIGH signal) determines the motor's behavior. A HIGH signal corresponds to a 1 and a LOW signal corresponds to a 0.
For 180° position servos as we use in the workshop, the pulse width controls the absolute angle. For 360° continuous rotation servos, the pulse width controls speed and direction.
- Servo Motor:
- Black wire → GND (Ground)
- Red wire → 3.3V (Power Supply)
- Yellow/Orange wire → GPIO 15 (Signal Pin)
step2_motor_move/main.py
Upload:
python utils/upload.py <PORT> step2_motor_move/main.pyAfter uploading press the reset button on the devboard.
Now you should see the motor move.
A real robot needs to interact with its environment. You can connect sensors or cameras to the ESP. In this mini tutorial we will use the internal capacity sensor of the ESP, which works as a touchpad.
Connect a jumper wire to one of the pins and make the color change based on the capacitance.
step3_sensor_integration/main.py
Upload:
python utils/upload.py <PORT> step3_sensor_integration/main.pyAfter uploading press the reset button on the devboard.
Now the color of your LED should change once you touch the PIN.
As a next step make the motor move to the 20° to the left when you touch the pin once and to the right when touching twice.
Use the helper script:
python utils/upload.py <PORT> <STEP_FOLDER>/main.pyOr use ampy directly:
ampy --port /dev/cu.usbserial-0001 put step1_led_blink/main.py /main.pyRe-watch this YouTube stream
This workshop was set up by @pyladiesams and @jquack
- ESP32-S3-DevKitC-1 Datasheet
- SG90 Servo Motor Datasheet
- MG90S Servo Motor Datasheet
- ESP32-S3 esptool Documentation
- MicroPython ESP32-S3 Docs
To ensure our code looks beautiful, PyLadies uses pre-commit hooks. You can enable them by running pre-commit install. You may have to install pre-commit first, using uv sync, uv pip install pre-commit or pip install pre-commit.
Happy Coding :)